Strategy
Stop Wasting Facebook Leads: Prioritize CPQL and Speed to Lead for Agents
By Nick Georgalos · 16 min read · Updated 2026-09-01
Stop Wasting Facebook Leads: Prioritize CPQL and Speed to Lead for Agents ! Insurance agent making prompt lead follow-up call Improving Facebook lead quality means prioritizing cost per qualified lead over cost per lead, then rebuilding targeting, offers, forms, and follow-up around that number.

Improving Facebook lead quality means prioritizing cost per qualified lead over cost per lead, then rebuilding targeting, offers, forms, and follow-up around that number. Expect fewer raw submissions and better close rates. The fastest levers are tighter audience layering, a narrower offer, two to four qualifying form questions, CRM feedback through the Conversion API, and follow-up inside five minutes.
TL;DR:
- Using targeted offers that specify the ideal buyer and realistic product details filters prospects before they click, reducing unqualified leads.
- Layering audience signals such as location, income, and homeownership refines targeting and minimizes wasted impressions on unlikely buyers.
- Limiting qualifying questions to two to four and ensuring they directly impact routing and eligibility enhances lead quality despite increasing form drop-off.
- Implementing real-time follow-up within five minutes significantly boosts conversion rates and keeps leads engaged, especially with automated confirmation and scheduling.
- Tracking downstream outcomes through CRM and Meta Pixel feedback ensures ad campaigns optimize for actual sales, not just form submissions.
Table of Contents
- How Do You Improve Facebook Lead Quality?
- Use Creative and Offers That Prequalify
- Layer Your Audience Targeting to Cut Wasted Reach
- How Many Qualifying Questions Should Your Lead Form Ask?
- Instant Form or Website Form: Which One Fits Your Offer?
- Teach Meta What a Quality Lead Looks Like
- Build a Follow-Up Workflow That Converts While Intent Is Warm
- Which Metrics Actually Prove Lead Quality Is Improving?
- Test in the Right Order and Know When to Scale
- What Working Campaigns Actually Look Like in Practice
- A One-Week Checklist to Run Right Now
- Get Exclusive, Higher-Quality Leads Without Buying Rented Lists
- Sources
How Do You Improve Facebook Lead Quality?
Most agents chase a low cost per lead and end up with a stack of unqualified names nobody wants to call. The fix isn’t a single setting. It’s a chain: the ad has to attract the right person, the form has to filter them, your CRM has to tell Meta which ones turned into real business, and your team has to call fast enough that intent hasn’t cooled.
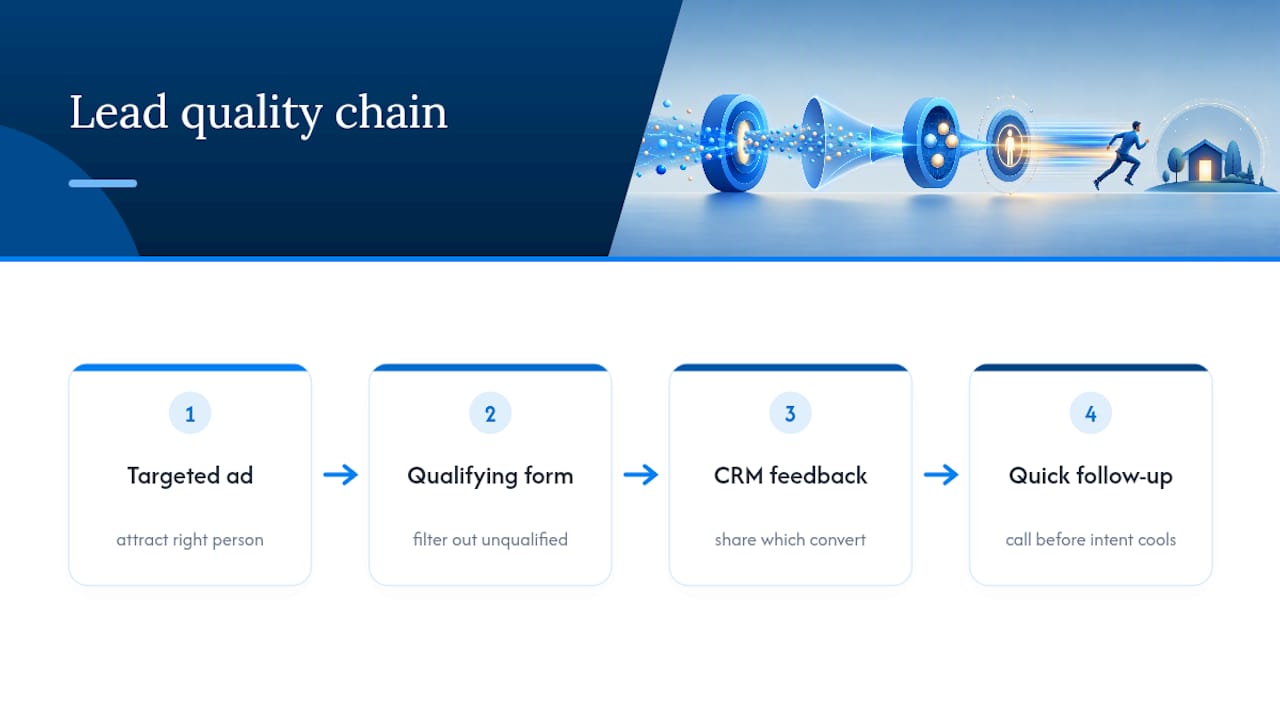
Skip any link in that chain and the others can’t compensate. A perfectly targeted audience still produces junk leads if your form asks nothing useful. A tight form still underperforms if follow-up takes six hours. Fix the whole sequence, not just the ad.
Use Creative and Offers That Prequalify
The offer in your ad does more filtering than any targeting setting Meta gives you. A vague “Get Your Free Quote” invites anyone with a pulse and a phone. A specific offer, like a final expense rate quote for a stated coverage amount, or a mortgage protection consult tied to a home purchase date, tells the wrong person to scroll past before they ever tap your ad.
Naming your intended buyer inside the creative itself does real filtering work. “For homeowners age 50 to 75 comparing final expense options” reads like a filter, not a slogan, because it invites self-selection before the click even happens.
Stock photography and generic CTAs are cheap signals, and prospects read them as such. Real proof, an agent’s own photo, a short video explaining the policy type, a specific dollar range, all signal that a real person and a real product sit behind the ad. That matters more than most agents assume, because the creative sets an expectation the form has to match.
- Name the exact product and outcome (coverage type, price range, or consultation type) instead of a generic “learn more” hook.
- State who the offer is for directly in the ad copy or headline.
- Swap stock photos for the agent’s own face, voice, or a short explainer clip.
- Make sure the form that follows asks about the same thing the ad promised.
Pro Tip: If your ad promises a “free consultation” but your form only asks for a phone number and zip code, you’ve created a mismatch. Prospects who wanted a real consultation bail when the form feels like a data grab instead.
Layer Your Audience Targeting to Cut Wasted Reach
Broad targeting spends your budget finding people who will never buy. Layering narrows the pool to people who resemble the ones who already did.
Start with lookalikes seeded from actual customers or accepted opportunities, not from raw lead-form submissions. A lookalike built off everyone who filled out a form, including the tire-kickers, just clones your worst leads at scale. Seeding from closed business or sales-accepted contacts produces a lookalike audience that mirrors buyers, not just clickers.
From there, stack additional layers: a geographic radius tied to your actual licensed service area, age and income tiers relevant to the policy type, and homeowner or life-stage proxies where the product calls for it. Final expense campaigns behave differently than mortgage protection campaigns, and the targeting layers should reflect that instead of using one audience template for every product line.
Exclusion lists matter as much as inclusion. Build a suppression list of past rejected leads, non-service-area zip codes, and anyone already in your pipeline, then exclude them from new campaigns.
- Seed lookalikes from closed sales or accepted opportunities, never raw form fills.
- Layer geography, age, income, and homeownership signals relevant to the policy type.
- Exclude prior rejects and out-of-area zip codes before launch.
- Start with a small, precise audience and expand only after it proves out.
Test small and precise first. A tight audience of 50,000 that converts well tells you more than a broad audience of two million that looks efficient on a CPL report but produces leads your team can’t close.
How Many Qualifying Questions Should Your Lead Form Ask?
Two to four qualifying questions is the range most agents settle on, but the number matters less than what each question changes. Before touching your form, pull your last month of sales calls and write down, in plain language, what actually separated a qualified lead from a waste of time. If you can’t state that definition, you can’t build a form that filters for it.
Once you know your definition, add questions that change routing or eligibility, not questions that just collect trivia. Budget range, timeline to purchase, service area confirmation, and current coverage status are the four that come up most often in insurance funnels. Each one should feed a decision: route this lead to a callback queue, flag it for nurture, or discard it outright.
- Keep contact fields (name, phone, email) on autofill or prefill; friction there filters out real prospects along with the bad ones.
- Use typed or multiple-choice fields for the qualifying questions themselves, since prefilled taps get skimmed and answered on autopilot.
- Add conditional logic so an out-of-area or “just researching” answer routes to a nurture list instead of your live call queue.
- Include an explicit opt-out option (“Not ready to buy, just exploring”) so uninterested clickers self-identify instead of becoming a wasted dial.
Adding these questions typically raises your cost per lead by 30% to 50%, because fewer people finish the form. That’s the point, not a flaw. Meta’s own guidance backs the same approach: qualifying questions and clear CTAs are the recommended path to better lead quality, not an afterthought bolted onto a generic form.
Pro Tip: Field-tested combinations worth stealing: contact info plus zip code, timeline, and budget for most service-based offers, or contact info plus a direct appointment booking for higher-consideration products like IUL consultations.
Instant Form or Website Form: Which One Fits Your Offer?
The right capture path depends on how much context the prospect needs before they’re worth calling, not on which one is easier to set up.
Instant Forms work best for simple, low-friction offers where mobile speed matters more than depth. A quick quote request or an initial interest check fits that mold. But native forms also make it easier for people to submit accidentally or half-heartedly, since prefilled fields lower the effort required to the point where some low-intent taps slip through.
Website forms fit better when the prospect needs pricing detail, appointment booking, or a longer qualification sequence before a call makes sense. The extra click to leave Facebook filters out casual browsers on its own.
- Use Instant Forms for simple, mobile-first offers where speed beats depth.
- Route to a landing page with a fuller qualification flow when the product needs pricing or scheduling context.
- Try a hybrid: Instant Form submission followed by a link to book a call, combining speed with a second qualification touch.
- Match your CTA copy to whichever next step the prospect actually faces.
Teach Meta What a Quality Lead Looks Like
Meta’s algorithm optimizes for whatever signal you feed it. Feed it raw form submissions and it will find you more raw form submissions. Feed it closed business and it will find you closed business.
That means installing the Meta Pixel alongside the Conversion API and building a pipeline that sends qualified and rejected outcomes from your CRM back into the ad account. Closed-loop tracking is what lets Meta’s algorithm optimize toward downstream conversions instead of the vanity metric of a completed form.
Two operational details make or break this. First, preserve campaign and ad identifiers through UTMs and consistent CRM field mapping, so you can trace a closed policy back to the exact ad and audience that produced it. Without that thread, you’re guessing which campaigns actually work. Second, automate the ingestion. Manual CSV downloads and copy-paste into a spreadsheet introduce lag that breaks the feedback loop, and a lead sitting untouched for two days behind a manual process is a lead that’s already gone cold.
- Install Pixel and Conversion API together, not one without the other.
- Map CRM outcome stages (qualified, appointment set, rejected, closed) to distinct offline events.
- Automate lead delivery from Facebook into your CRM to eliminate manual lag.
- Send offline conversion events for appointment-set and policy-closed milestones, not just form completion.
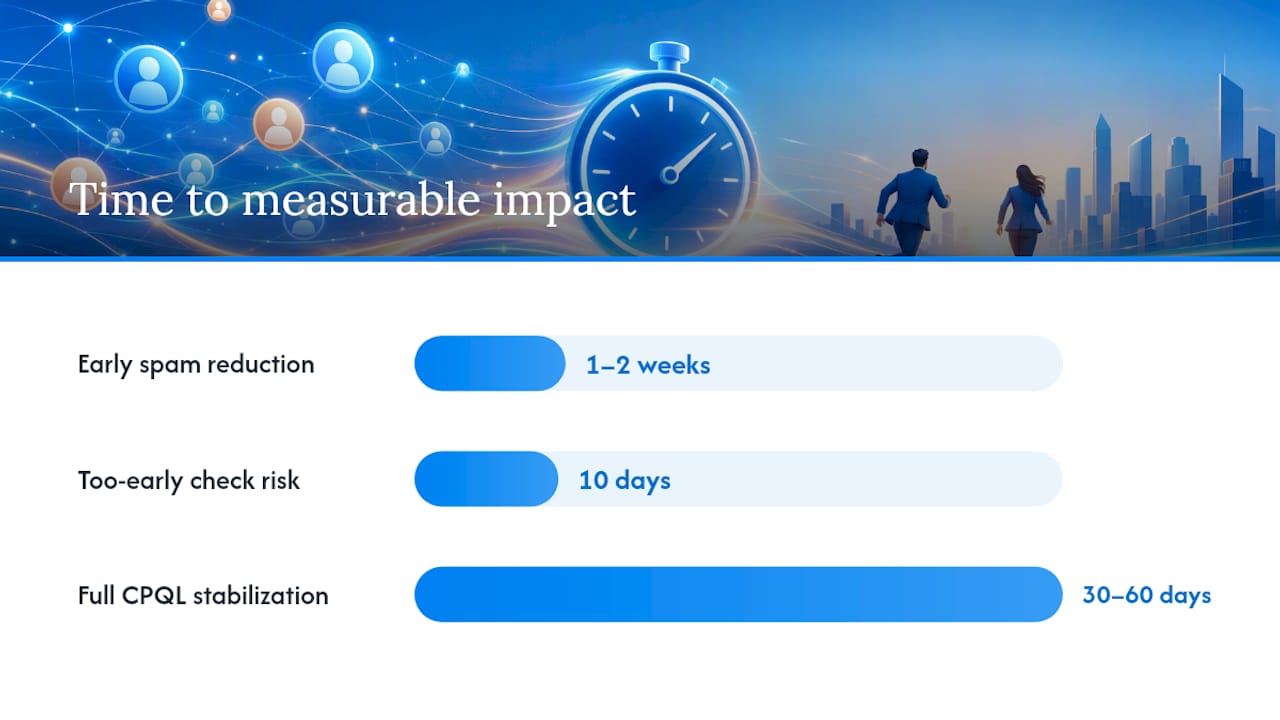
Full CPQL stabilization typically takes 30 to 60 days after tracking and CRM feedback go live, though early spam reduction often shows up within the first one to two weeks. Agents who check results at day ten and declare the fix a failure are quitting before the algorithm has enough data to actually learn.
Build a Follow-Up Workflow That Converts While Intent Is Warm
A qualified lead that sits for six hours behaves like an unqualified lead. Speed to lead isn’t a nice-to-have layered on top of good targeting and good forms. It’s the step that determines whether all that upstream work pays off.
The sequence that works starts with an immediate automated confirmation the moment the form submits, something as simple as a text or Messenger reply confirming receipt. That’s followed within minutes by automated qualification or a scheduling link, then a human touch within hours, not days.
- 0 minutes: Automated confirmation via SMS or Messenger so the prospect knows the submission landed.
- 0 to 5 minutes: Automated qualification message or a direct calendar link, letting warm prospects book a call themselves while the ad is still fresh in their mind.
- 0 to 24 hours: Human outreach by phone or a personalized message, for anyone who didn’t self-book.
- Ongoing: Rules that retire stale leads after a set window and flag rejections, so they get excluded from future lookalike seeding instead of quietly poisoning it.
Response speed inside five minutes correlates with conversion gains as high as 30% to 50% versus slower manual follow-up, largely because intent decays fast once someone leaves the ad and moves on with their day.
Pro Tip: A calendar-booking link inside your automated qualification message often outperforms “we’ll call you soon.” It shifts the next action to the prospect while they’re still engaged, instead of leaving them waiting on your team’s timing.
Which Metrics Actually Prove Lead Quality Is Improving?
Cost per lead tells you how much you spent. It doesn’t tell you whether any of it turned into business. The metrics that matter sit downstream of that number.
Valid-lead rate, cost per qualified lead, sales-acceptance rate, opportunity rate, and close rate form the primary KPI set worth building a dashboard around. Cometly’s guidance on lead generation reporting makes the same case: shifting the primary metric from CPL to CPQL changes which campaigns look successful, sometimes dramatically.
Secondary diagnostics, form completion rate, click-through rate, average response time, and cost per booked appointment, help you diagnose where a campaign is leaking quality before it shows up in your close rate weeks later.
| Metric | What it tells you | Check frequency |
|---|---|---|
| Valid-lead rate | Share of submissions that pass basic qualification | Weekly |
| Cost per qualified lead (CPQL) | True cost of a lead worth calling | Weekly |
| Sales-acceptance rate | Share your sales team actually works | Weekly |
| Form completion rate | Where prospects drop off in the funnel | Biweekly |
| Cost per booked job | Real business cost, not ad-platform cost | Monthly |
Tag every lead with source and campaign identifiers so you can report at the campaign, ad set, and ad level, not just the account level. When CPQL climbs and sales-acceptance falls, pause and diagnose before spending more. When both hold steady or improve as you raise budget, that’s your signal to scale.
Test in the Right Order and Know When to Scale
Random testing wastes budget because it can’t isolate what actually moved the needle. Work through changes in a fixed sequence: offer and audience first, since they determine who sees the ad at all, then form questions, then creative variations, and only then placement tweaks.
Before scaling budget on anything, confirm CPQL and sales-acceptance rate stay consistent, not just that CPL held steady. A campaign that keeps CPL flat while CPQL climbs is quietly getting worse even as the dashboard looks fine.
- Run a short weekly lead-quality audit: service area accuracy, budget fit, timeline, and where each lead is stalling in the pipeline.
- Change one variable at a time so you know what actually caused a shift.
- Scale spend only when CPQL and sales-acceptance hold steady across at least a week of data.
- Pause scaling immediately if CPQL rises or sales-acceptance drops, even if CPL looks better than ever.
A structured weekly audit is usually enough to catch drift before it becomes a wasted month of ad spend.
What Working Campaigns Actually Look Like in Practice
Fexads runs Facebook ad management exclusively for licensed life insurance agents selling final expense, IUL, and mortgage protection, and every lead generated lands directly inside the agent’s own ad account. That distinction shapes everything above: agents own their data, which means the lookalike seeding, CRM feedback, and audience refinement described in this guide keep compounding over time instead of resetting with every new batch of rented leads.
Campaigns are built around the same principles covered here, custom qualifying questions per policy type, CRM mapping so Meta learns from real outcomes, and follow-up playbooks tuned to how fast final expense and mortgage protection prospects go cold. The speed-to-lead playbook and the lead form versus landing page breakdown both come out of that same operational playbook, as does the IUL-specific campaign guide for agents working that product line.
A form asking “What’s your monthly budget for coverage?” combined with a follow-up sequence hitting inboxes inside five minutes routinely outperforms a bare name-and-phone form with a next-day callback, not because either piece alone is magic, but because the whole chain holds together.
- Exclusive, owned leads inside the agent’s own ad account, never shared or resold.
- Custom campaign builds per policy type instead of a single generic template.
- CRM integration mapped to real sales outcomes, not just form completions.
- Real-time performance visibility so agents can see what’s working without waiting on a monthly report.
A One-Week Checklist to Run Right Now
Start with three fixes you can finish in three days: add two qualifying questions that change routing, tighten your audience to a smaller, precise segment, and automate your CRM sync so outcomes flow back to Meta without manual work.
From week two through eight, watch valid-lead rate, cost per qualified lead, and how fast your team responds to new submissions. If those three trend the right direction, the rest tends to follow.
Escalate to technical fixes the moment you see tracking loss or a conversion event that isn’t mapping correctly. No amount of form tweaking or creative testing fixes a broken pixel. Data problems always outrank optimization problems, and skipping that order wastes weeks chasing symptoms instead of the cause.
— Nick
Get Exclusive, Higher-Quality Leads Without Buying Rented Lists
Fexads exists for one reason: agents get tired of paying for leads that three other people are also calling. Every lead generated through a Fexads campaign lands directly in your own ad account, which means the audience layering, CRM feedback, and lookalike refinement covered in this guide keep improving your results month after month instead of resetting every time you buy a fresh batch.
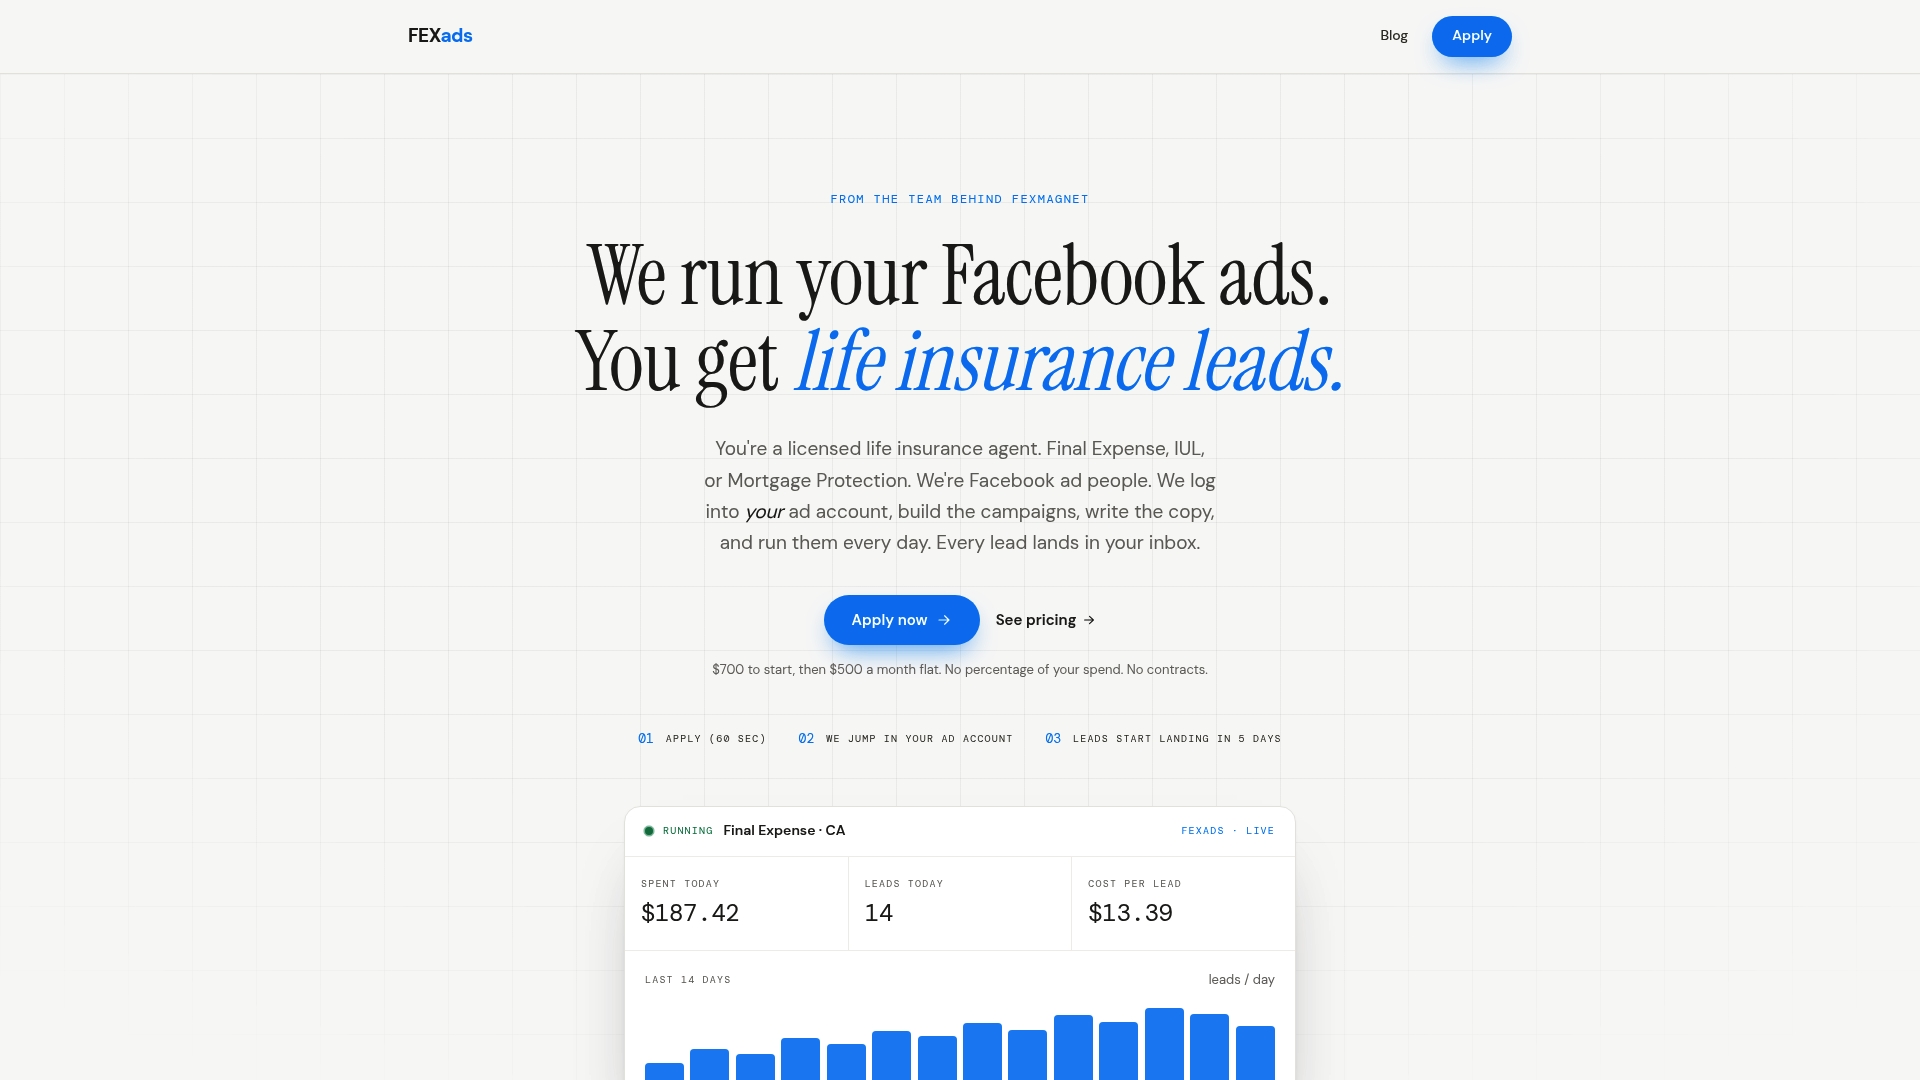
Setup includes a custom campaign build, pixel installation, form and audience configuration tailored to your policy type, and CRM mapping so your ad account learns from real sales outcomes, not just form completions. Ongoing management covers daily optimization, creative refreshes, and compliance checks, with follow-up workflows built on the same speed-to-lead principles outlined above. Most agents see early quality signals within the first two to three weeks, with fuller CPQL stabilization by month two once tracking and feedback loops are fully in place.
If you’re ready to see what exclusive Facebook leads look like for your state and policy type, check Fexads’s state-by-state final expense ad management to find your market and get started.
Sources
Meta’s own lead ads best practices page covers form design and qualifying-question guidance in more depth. For technical tracking setup, the offline conversion tracking guide walks through mapping CRM events to ad campaigns. Fexads also maintains a glossary of Facebook ad terms specific to life insurance lead generation, and a CPL calculator for benchmarking costs by vertical.
- Best Practices to Create Lead Ads | Meta Business Help
- Meta Lead Ads: How to Improve Lead Quality Without Killing Volume — AdSpyder
- Facebook Ads Sending Low Quality Leads? The 7-Step Fix — Elev8 Operations
Recommended
Want us to run your FE ads?
$200 to launch, custom website included. $500 a month flat, starting at your first sale.
Apply now