Strategy
Media Buyers: 50 Conversion Rule for Lowest Cost vs Cost Cap
By Nick Georgalos · 13 min read · Updated 2026-09-09
Media Buyers: 50 Conversion Rule for Lowest Cost vs Cost Cap ! Media buyer reviewing campaign bidding controls Use Lowest Cost (Highest Volume) for most campaigns.

Use Lowest Cost (Highest Volume) for most campaigns. Reserve Cost Cap for ad sets that already have a stable conversion volume and sufficient weekly spend, where a real trailing CPA exists to anchor the cap. Set the cap below that trailing number and Meta typically throttles delivery instead of spending your budget. Bid Cap is a specialist tool for a later stage entirely.
TL;DR:
- Use Lowest Cost for most campaigns to maximize volume and speed up the learning phase, reserving Cost Cap for stabilized accounts with enough data.
- Set a Cost Cap above your trailing CPA, not your aspirational target, and only switch after achieving at least 50 conversions per week with a minimum $5,000 weekly spend.
- Avoid setting Bid Cap prematurely, as it often results in under-delivery unless you have precise auction-level data, because it enforces a strict ceiling on every auction.
- When adjusting Cost Cap, always duplicate successful ad sets, set the initial cap at the trailing CPA, and tighten gradually by 5-10% after a stable week to prevent delivery drops.
- Regularly monitor your CPA fluctuations, especially in fluctuating markets, and split caps by audience type to avoid starving prospecting campaigns while retargeting remains stable.
Table of Contents
- Lowest Cost vs Cost Cap vs Bid Cap: The Quick Comparison
- How Does the Auction Actually Treat Each Strategy?
- When Should You Actually Switch to Cost Cap?
- How Do You Set Up Cost Cap Without Breaking Delivery?
- Why Did My Campaign Stop Spending, and What Do I Fix First?
- What a Managed Media Buyer Actually Does With These Caps
- Where to Verify These Bidding Thresholds Yourself
- Sources
Lowest Cost vs Cost Cap vs Bid Cap: The Quick Comparison
Each of Meta’s three bidding options hands a different amount of control to the algorithm, and that control tradeoff is the entire decision.
Lowest Cost (Highest Volume) sets no bid guardrail at all. Meta spends your full budget chasing the cheapest conversions it can find, which is why it’s the platform’s default and usually the fastest strategy to exit the learning phase.
Cost Cap targets an average cost per action across the ad set. Meta can bid above your cap on individual auctions as long as the running average lands near your target, which gives it more flexibility than people expect, but also more room to misfire if the number is wrong.
Bid Cap sets a hard ceiling on every single auction. No averaging, no flexibility. If the auction clears above your number, you simply don’t win that impression.
| Strategy | Bid Control | Delivery Behavior | Best For |
|---|---|---|---|
| Lowest Cost | None, algorithm-optimized | Spends full budget, prioritizes volume | Launches, testing, most ongoing campaigns |
| Cost Cap | Soft average CPA target | Can underspend if cap is unrealistic | Scaling proven offers with stable CPA data |
| Bid Cap | Hard per-auction ceiling | Frequently under-delivers | Advanced buyers with precise auction economics |
The practical takeaway: Lowest Cost spends what you give it, Cost Cap spends what the average allows, and Bid Cap often spends far less than you’d like. Picking the wrong one for your account’s data maturity is the single most common reason ad sets stall.
How Does the Auction Actually Treat Each Strategy?
Meta’s auction doesn’t pick a winner by price alone. It scores every ad on what’s often called a total value calculation, blending your bid, estimated action rate, and ad quality. A lower bid can still win if the ad is more relevant to that person, which is exactly why bidding strategy changes delivery patterns in ways that surprise advertisers used to simpler auction models.
Lowest Cost removes the bid variable almost entirely. Because there’s no ceiling, Meta’s system can chase every promising signal across the widest possible pool of auctions. That’s why it’s recommended for testing: the algorithm gets maximum freedom to find your cheapest converters, and it tends to exit the learning phase faster because it isn’t fighting a constraint while it’s still figuring out who your buyers are.
Cost Cap changes the math without eliminating flexibility. You’re not setting a per-auction limit. You’re setting an average CPA the campaign should land near over time. That means Meta can and will bid above your cap on specific auctions, betting that cheaper wins elsewhere balance it out. This is the detail most advertisers miss, and it’s worth understanding before you touch the setting: a Cost Cap of $40 doesn’t mean every conversion costs $40 or less. It means the average should hover near $40, with some auctions costing more and others less.
The problem shows up when the cap sits below what the market actually charges. If your cap is $25 but the real clearing price for your audience is $38, Meta won’t chase deficit auctions to hit an impossible average. It scales back participation instead, and you watch impressions and spend collapse in the dashboard for no obvious reason.
Bid Cap removes the averaging safety net completely. Every auction has to clear at or below your number, full stop. That’s a rational choice only when you already know, from real data, roughly what a conversion is worth in that specific auction pool. Most advertisers reach for Bid Cap because they want predictability, but they apply it before they have the auction-level knowledge that makes it work, and severe under-delivery is the near-universal result.
A few mechanical points worth holding onto:
- Lowest Cost adjusts bids in real time across every auction it enters; you never see or set an actual bid number.
- Cost Cap lets you set one input (the target CPA), but Meta still controls individual bid amounts behind that target.
- Bid Cap is the only strategy where your number functions as a literal price ceiling, not a target.
- All three strategies respect the same auction quality scoring; a cap doesn’t buy you a quality exemption.
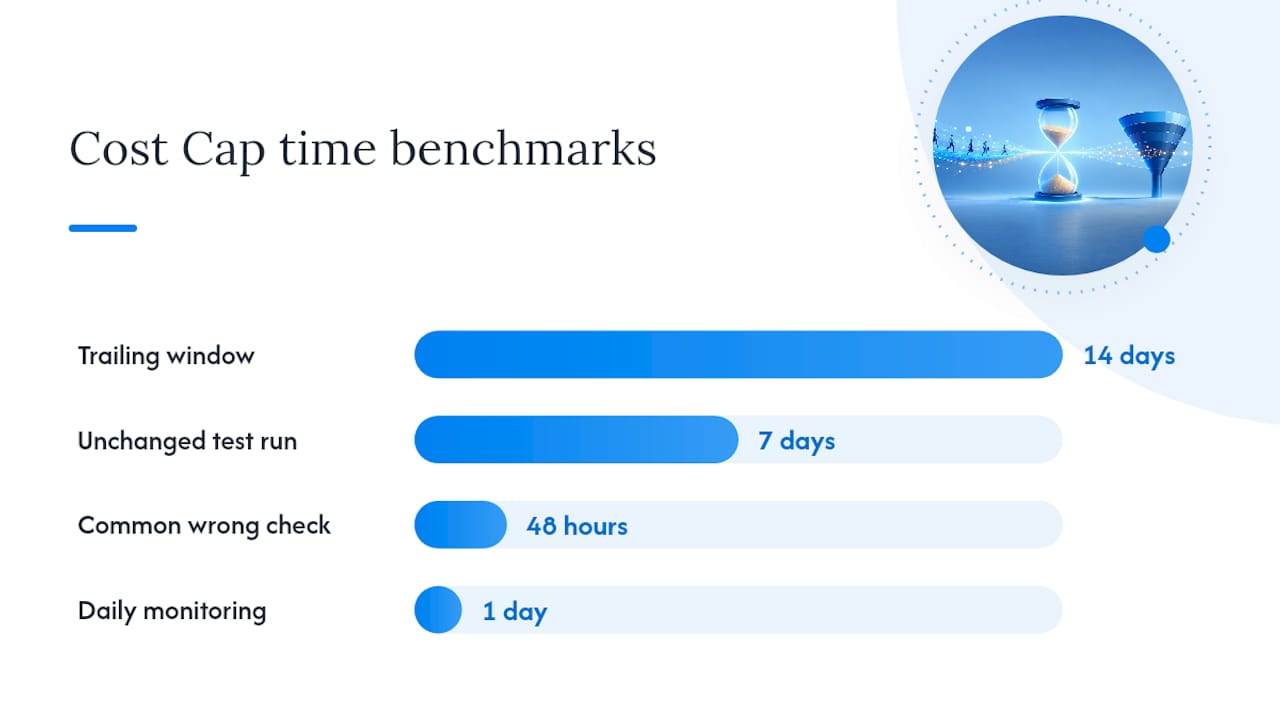
Pro Tip: Before setting any cap, pull your last 14 days of Lowest Cost data and look at cost per result by day, not just the campaign average. A campaign averaging $32 might have swung from $22 to $51 depending on the day. Set a cap below the peak and you’ll choke delivery on your worst (but still profitable) days.
Understanding CPMs matters here too. When auction pricing climbs during high-competition periods, a static cap that felt generous in March can feel restrictive by June. Caps aren’t set-and-forget; they’re relative to a moving auction, which is part of why so many advertisers set one and abandon it without noticing the market shifted underneath it.
When Should You Actually Switch to Cost Cap?
Start every new campaign, offer, or audience on Lowest Cost. No exceptions at launch. You need volume and signal before you have anything reliable to cap against, and switching too early is the single most common way advertisers sabotage a campaign that was working fine.
From there, the decision comes down to three thresholds:
- Conversion volume. Your ad set needs to be generating close to 50 conversions per week before a Cost Cap has enough data to average against. Below that, daily noise swamps the signal and the cap fights randomness instead of a real trend.
- Weekly spend. Practitioner guidance puts the workable floor around $5,000 in weekly ad-set spend. Below that, Meta doesn’t have enough auction volume to smooth an average CPA without wild swings.
- A real trailing number, not a wish. Set your initial cap at your trailing 14-day CPA under Lowest Cost, never at your aspirational target. If Lowest Cost has been averaging $34 and your margin needs $25, don’t set a $25 cap and expect it to somehow deliver that price. Set it at $34, confirm stable delivery, then tighten.
A stable conversion volume and sufficient weekly spend are the two key factors that decide whether Cost Cap will behave predictably or throttle your account into silence.
Once those thresholds are met, the migration itself should be conservative. Duplicate the winning ad set rather than editing it in place, so you keep a Lowest Cost control running alongside the Cost Cap test. Set the new ad set’s cap at trailing CPA, let it run for a full week without touching it, then tighten by 5% to 10% if delivery and CPA both stay stable. Repeat weekly rather than jumping straight to your target number.
There’s also a smaller category of advertiser who justifies Bid Cap or a stricter Cost Cap for reasons beyond pure performance: hard compliance limits, contractual margin floors, or a CPA ceiling set by a business rule rather than a marketing preference. That’s a legitimate use case, but it’s a business constraint dressed up as a bidding decision, and it comes with the same risk of under-delivery as any other premature cap. If your account is smaller or newer, Lowest Cost typically remains the right default until spend and conversion volume genuinely support something tighter.
How Do You Set Up Cost Cap Without Breaking Delivery?
Before you touch the bid setting, run three checks. Confirm your pixel or conversion API is firing cleanly, since a Cost Cap built on shaky data is a cap built on a fiction. Pull 14 days of trailing CPA from the Lowest Cost ad set you’re duplicating. And size your daily budget so it can absorb at least a few conversions a day at the cap you’re about to set, otherwise you’re capping a data trickle.
The setup sequence that avoids most disasters:
- Duplicate the winning ad set rather than editing the live one in place.
- Set the initial Cost Cap at the trailing 14-day CPA, not below it, as explained here.
- Let it run a full week untouched before judging results.
- Watch two numbers daily: delivery pace (is it spending?) and CPA stability (is it near the cap?).
- Tighten by 5% to 10% only after a stable week, never all at once.
The mistakes that show up most often are almost always variations on impatience. Setting the cap at the target CPA instead of the trailing CPA is the most common one, and it’s the fastest route to zero impressions. A close second is capping an ad set that’s still in the learning phase, which resets learning and adds a cap constraint at the exact moment the algorithm needs freedom to explore. Third is judging results after 48 hours instead of a full week, which mistakes normal daily variance for a broken cap.
Recovery is simple once you spot the symptom. If delivery drops off, raise the cap back toward the trailing CPA and give it another week. If a second attempt still struggles, revert that ad set to Lowest Cost entirely and revisit Cost Cap once weekly volume grows.
Pro Tip: Keep a running log of your trailing CPA every time you touch a cap. Six months from now, you’ll be able to see whether tightening actually held margin or whether you slowly strangled volume without noticing, one 5% cut at a time.
Why Did My Campaign Stop Spending, and What Do I Fix First?
Diagnosing a stalled Cost Cap campaign follows a fairly predictable order. Work through it in sequence rather than changing three things at once, or you’ll never know which fix actually worked.
- Zero or near-zero impressions right after setting a cap. This is almost always a cap set below the auction’s clearing price. Raise the cap to your trailing CPA and give it 48 to 72 hours to recover before judging again.
- Spend is flowing but CPA is volatile day to day. This usually points to insufficient conversion volume for the average to smooth out. Check whether you’re still under the roughly 50-conversions-a-week mark; if so, either widen the audience or drop back to Lowest Cost until volume builds.
- Delivery was fine for weeks, then suddenly dried up. The market shifted under a static cap. Seasonal competition, a new advertiser entering your audience, or an algorithm update can all raise the real clearing price. Pull a fresh trailing CPA and reset the cap to match current conditions.
Prospecting and retargeting ad sets behave differently under the same cap, which trips up a lot of accounts. A retargeting audience often converts at a lower CPA, so applying one shared cap across both frequently starves prospecting while retargeting looks fine. Split the caps by audience type rather than forcing one number to fit two very different funnels.
Know when to stop tinkering, too. If you’ve raised a cap twice and delivery still won’t stabilize, that’s the signal to pause the cap test entirely rather than iterate a fourth time. Go back to Lowest Cost, let the ad set rebuild volume for two weeks, and try the migration again with a fresh trailing number.
What a Managed Media Buyer Actually Does With These Caps
Bidding strategy stops being theoretical the moment you’re managing campaigns for licensed life insurance agents selling final expense, IUL, or mortgage protection, where a bad week isn’t an abstraction, it’s a client waiting on leads that never showed up.
Many new agent campaigns start on Lowest Cost first, for the same reason outlined above: you need real conversion data before you can cap anything intelligently. Because leads generate directly inside the agent’s own ad account rather than through a shared, rented pool, the CPA history that builds up is genuinely owned campaign by campaign, audience by audience. That ownership matters more in insurance than in most verticals, since compliance requirements and acceptable CPA variance shift depending on the product line, and a cap that works for a final expense campaign can misfire entirely on a mortgage protection audience with different volume and seasonality.
The caps we do apply get set the same way described here: trailing CPA, tightened gradually, never aspirational from day one, which is a key skill for any experienced media buyer managing these campaigns. For agents deciding whether to run this themselves or hand it to a team that watches it daily, the honest answer is that the mechanics aren’t complicated. The discipline to check delivery daily and resist tightening a cap too fast, week after week, is where most self-managed accounts lose ground.
— Nick
Where to Verify These Bidding Thresholds Yourself
Meta’s own documentation on bid strategy behavior is the starting point for the conversion volume and spend thresholds cited throughout this piece. For a deeper mechanical breakdown of how Cost Cap’s averaging actually works, the Ad Stack explainer walks through the auction-level math in more detail than most guides attempt.
For migration and testing sequences, LeadEnforce’s comparison and Thread Transfer’s step-by-step breakdown both cover the duplicate-and-test approach referenced above. If you want to model your own CPA numbers before setting a cap, run them through the CPL calculator rather than guessing at a round number.
Sources
- Meta Bid Strategy Guide 2026: Lowest Cost vs Cost Cap vs Bid Cap
- Meta bid strategies explained: cost cap, bid cap, lowest cost
- Lowest Cost vs Cost Cap vs Bid Cap: When Each Strategy Actually Works
- Cost Cap vs Bid Cap vs Lowest Cost: Meta Bidding Guide | Daily Intel Service
Recommended
Want us to run your FE ads?
Two plans from $200 setup. A flat monthly fee from $500 that starts at your first sale.
Apply now